The Teacher Gradebook allows teachers to enter different types of assignments and options. In this article, we will cover creating assignments and options that are available for those assignments.
Create Assignments
Alert: At least ONE category MUST be created in order to create an Assignment for the Gradebook. For more details on creating categories click here.
Create Assignment
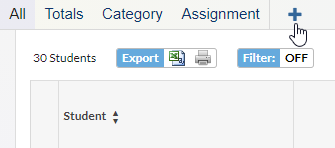
Select a course section in the top right hand corner of the portal screen. Go to the Grades menu and select Gradebook. Click the + sign next to Assignment in the upper left corner. At least one gradebook category must have been created or an error message will display.
Enter a Title for the assignment. Enter the number of Points the assignment is worth. Select the Category. If only one category exists, it displays by default. Ensure the Assigned and Due Date are correct for the assignment.
If you want to add the assignment to additional classes besides the one you have selected at the top of Focus, under Linked Sections, select the appropriate sections that need this assignment. The section that is selected in the upper right corner will be selected by default in this dropdown. The remaining fields are optional. Click Save.
Note: At the beginning of each quarter, you may need to open each gradebook before all of your sections will show in the Linked Sections dropdown.
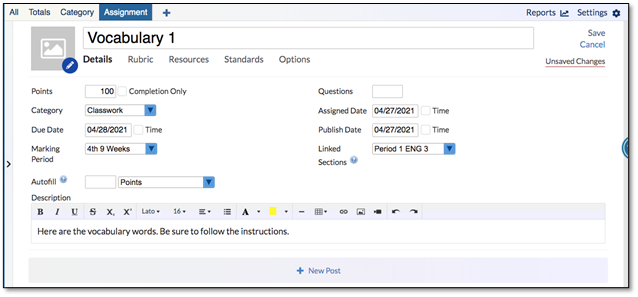
The assignment will now display for review. Click All in the upper left corner. This will display the new gradebook assignment in the gradebook. To make additional changes to the assignment, click the i in the bottom right hand corner of the box that contains the title of the assignment.
Assignment Options
On the assignments screen under the Assignment Title box you will find 5 tabs: Details, Rubric, Resources, Standards and Options. Below is detailed information on the fields and options available on the Details tab. For information on the other four tabs, see Gradebook Assignments - Advanced article here.
Details tab
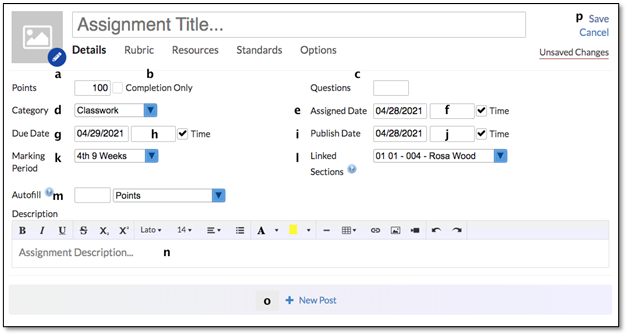
a. Enter the number of Points possible in the text box. If a value was entered for Default Assignment Points in Gradebook Settings, the points box will automatically be populated with that value, but you can make changes here if needed. If the points box is left blank, then the assignment grade will be taken out of 0 points and will count as extra credit.
b. Check the box Completion Only to create the assignment as a checklist. The points box will be hidden when this box is checked. For example, to track forms students must turn in to the teacher.
c. Enter the number of Questions in the blank text box (optional). This must be used if the intent is to enter scores based upon questions correct/incorrect.
d. Select the Category in the drop-down. If only one category exists, it displays by default.
e. Enter the Assigned date that the assignment will begin. The Assigned date will default to the date the assignment is created, but can be modified to delay displaying the assignment as applicable.
f. Check the Time box to enter a specific time the assignment will be available (optional). If no time is entered, the assignment will be available starting at midnight of the Assigned date.
g. Enter the date that the assignment Due to be turned in by the class.
h. Check the Time box to add enter the specific time on the Due date (optional). If no time is entered, the assignment will be due starting at 11:59 pm of the Due date.
Info:
-
- If both Allow Student Uploads and Don’t Allow Late Submissions are enabled on the Options tab, then students will NOT be able to upload documents after the Due Date and Time.
- If the District is using the Create Assessments module, and an Assessment is attached to this assignment, the Assessment will no longer be available on the Student portal after the Due Date and Time.
i. Enter the Publish Date that the assignment will be displayed on the Parent/Student Portal. The Publish Date will default to the date that the assignment is added, but can be modified to delay displaying the assignment as applicable.
j. Check the box Time to enter a specific time on the Publish Date the assignment displays (optional). If no time is entered, the assignment will be available starting at midnight of the Publish Date.
k. Select the Marking Period for the assignment.
l. In the Linked Sections drop-down, select the course section(s) that to which the assignment should be added. If Add All Assignments to Each Section of Your Course by Default was selected, sections with the same course number will be auto-checked as long as the Category has been created in the other sections. Select Check All to add the assignment to all sections.
Info: Only sections that have this Category will display in the drop-down. If the Assignment should be added to sections that do not display in the drop-down, the Section(s) will need to be linked on the Edit Category pop-up.
m. The Autofill box should not be completed until ready to grade the assignment.
n. Enter a Description of the assignment (optional) which will display when the parent/student hovers over the assignment in the parent/student portal.
o. Click to add a Post to the assignment (see the next section on Assignment Posts).
p. Click Save to save this assignment.