Locking Student Schedules
Schedules can be locked through the Lock Schedules function. This prevents the selected students’ schedules from being affected by subsequent Scheduler runs.
In the Scheduling menu, select Lock Schedules.
On the Search Screen, enter search criteria to locate the group of students. For example, if all grade 12 schedules have been set up and should be locked, select Grade 12 in More Search Options and click search.
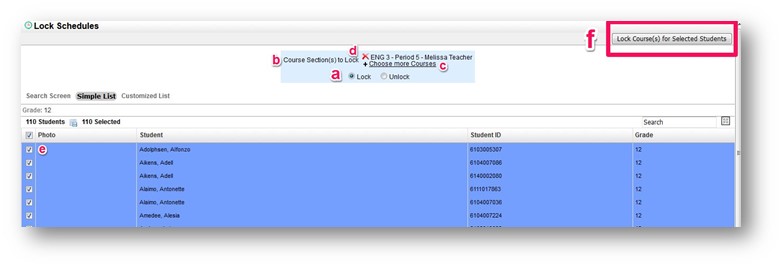
(a) At the top of the screen, the Lock radio button is selected by default.
(b) By default, it will lock all sections on the student schedule. To lock only certain sections, click the link next to Course Section(s) to Lock.
(c) More sections can be selected by clicking the Choose more Courses
(d) To remove a selected section, click the red X next to the section name.
(e) Select the check box next to each student who will have their schedules locked. Click the check box in the header to select all students in the list
(f) At the top-right corner of the screen, click Lock Course(s) for Selected Students.
A green checkmark and confirmation message will display at the top of the screen.
Note: Student schedules can be unlocked by following the same procedure. Select the Unlock radio button at the top of the Lock Schedules screen.
Locking Individual Students and Classes
Prior to the start of the school year, all classes on a student’s schedule will display a padlock.
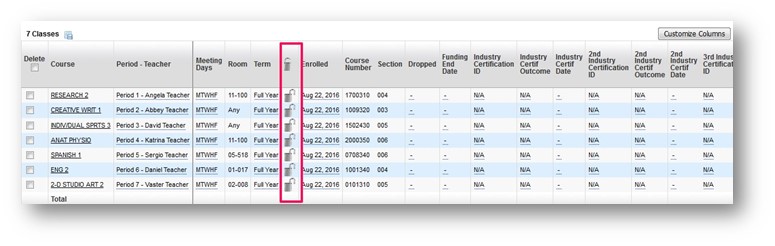
By default, all schedules are set to Unlock position. You can lock individual classes by going to the student's schedule and clicking on the padlock and clicking save.
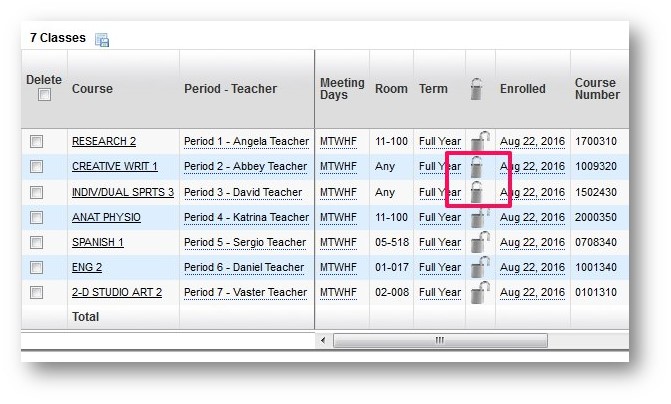
The padlocks will then display as locked and those classes will be protected from any additional runs of the scheduler.
Hide Schedules
Focus allows you to Hide Schedules from Teachers, Parents, and Students during the schedule building process. This system preference is a great tool because it allows you to develop your schedules without publishing them.
To hide schedules, go to Setup > System Preferences then click on the Default School Preferences tab if you want to make this change for all schools or click on School Preferences to just make the change in the school you have selected at the top of Focus, then click on the Scheduling tab,
You will see two checkboxes related to hiding schedules.
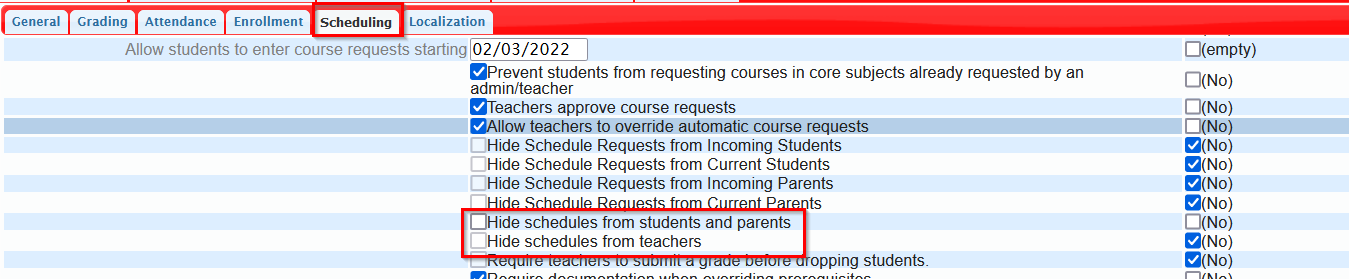
- Hide schedules from students and parents – Checking this box will hide schedules from the student and parent portal. Make sure you are in the upcoming year’s system preferences when you make this change.
- Hide schedules from teachers - Checking this box will hide schedules from teachers. Make sure you are in the upcoming year’s system preferences when you make this change.
When under the School Preferences tab, if the district default is set to NO on the right-hand side of the screen you will need to uncheck the default to make a change to the preference
** If you hide schedules it is important to go to profiles> student fields and uncheck the current grades tab /fields from parents and students. **